Thursday, September 30, 2010

8. saute/sweat


(Part of The Cookbook)


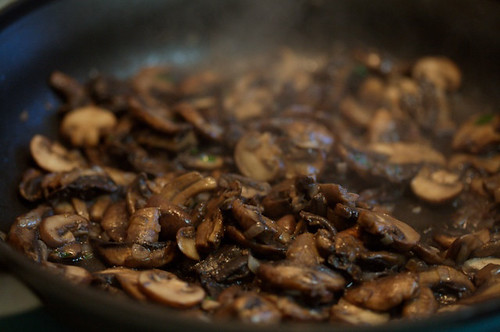
You've got a saute pan, which is a shallow, wide pan with a handle. You've got the pan hot. You put a bit of oil in the pan, and the oil can withstand a lot of heat because you very wisely chose vegetable, canola, grapeseed or peanut oil. And because the oil can withstand a lot of heat, it's getting really hot without smoking yet, and that's good for the flavor of your finished dish and for your health. You've got some food items all prepped and beautifully ready in little bowls next to the hot, oiled pan.

It's an exciting time, baby. You're about to saute.

Sauteeing is a dry heat cooking method. If you don't know what that means, stop and read this first. So, you'll be browning the food items you're sauteeing. You're cooking with a lot of heat and a little fat in a container that will allow steam to evaporate, rather than accumulating to create a steaming effect, which is a wet cooking method. Properly done, sauteeing cooks vegetables while preserving some of their natural crispness. It browns and cooks meat while preserving some natural juiciness. Improperly done, it makes a soggy mess; one of the main reasons this happens is either that the pan is overcrowded or the heat is too low, usually the former.

Flipping the items in the pan every four seconds is not sauteeing. Flip or stir the food every once in a while to make sure it's cooking evenly, but you need the food in contact with the pan for most of the time in order for it to cook properly.

Here are some great recipes for practicing sauteeing:


Sweating is not sauteeing, but I included it here because it's a very similar process. Sweating is more of a wet cooking method than dry: it's basically low-heat sauteeing where it's OK to overcrowd the pan, since you want to encourage the steam from the food items to cook the other items around them. It's useful if you don't want to brown your food, or if you want to cook it gently.

Stir-frying is the opposite.. it's very high heat sauteeing, where you have to move the food around in the wok or pan quickly so it doesn't burn. It's fun! And healthy, because generally, the longer you cook something, the less nutritious it becomes (especially vegetables).

4. knife skills


(Part of The Cookbook)


An important revelation for me was that every knife cut you make in the prep phase affects the cooking phase. How could it be otherwise? The smaller the item you're cooking, the less time it takes to cook. Not just that, but the shape you cut things into affects their cooking, too. A carrot that's cut into long and flat planks will cook faster than the same-size carrot cut into cubes, because there's more surface area in the first shape to absorb heat. This is probably obvious to you, but I'm a bonehead sometimes.

So, by paying attention to the size of things I was cutting, I became a better cook. If you're cutting carrots, try to get them the same size and shape, and they will be ready at the same time. If you're cooking multiple things together (like you usually will), cut them so they'll be ready at the same time.

Cook this recipe a few times and you'll understand what I mean really well: Red Cabbage & Cashew Slaw, Stuffed Collard Greens and Red Quinoa with Caramelized Fennel

It's important to hold a knife correctly, but what you do with your other hand (your "guiding hand") is even more important. You must learn to use "the claw." You hold the item you're cutting, but you tuck your fingertips under your knuckles and you tuck your thumb behind your fingers. This feels really awkward at first, but it pays off, because if you keep your guiding hand in this position, it's nearly impossible to cut yourself. Eventually, you will develop a sense of your thumb or fingertips being in danger if you slip out of the claw position.

If you want lots of practice cutting things, buy a bag of potatoes. Practice your hand position and also practice dicing at the same time: Cut a flat bottom and rest the potato on it, then cut 1/2 inch wide planks, take the planks and cut them into 1/2 inch wide batons, then take the batons and cut them into 1/2 inch wide cubes. There, you just medium-diced a potato (small-dice is 1/4 inch on a side, and large-dice is 3/4 inch on a side). Repeat until you're out of potatoes, then make a bunch of mashed potatoes.

I hope you like mashed potatoes!

3. understand prep vs. production


(Part of The Cookbook)


In nearly every recipe, there's a crucial point to observe: The time it's OK to take a break. This magic time occurs between the preparation of ingredients for cooking and the beginning of the actual cooking (a.k.a.: prep vs. production). Most recipes omit this detail. In most of my recipes on this blog, the prep work is listed in with the ingredients (e.g.: "1 head garlic, cloves peeled & sliced"), and the first step of the instructions marks the beginning of production.

The idea is that first, you wash and cut your produce, cut any meat, and get everything else physically together that you will need to make the dish. Once you've done that, you can take a little break. Or a long one. Sometimes you can prep a day or two in advance, if the quality of your ingredients won't suffer. This is what cooks do in restaurants; it's why you can get pot roast that needs to be cooked for 3 hours on your table 15 minutes after you order it, or risotto that takes 40 minutes to cook in the same 15 minutes. The pot roast was cooked already and cooled; it just needed reheating in some delicious sauce, which was also made in advance. The risotto was cooked 2/3 of the way, cooled, and finished when the cooks got your order. This is how you can make cooking at home easier. Even a short break makes the whole experience nicer for you.

So, once you've got everything in your dish washed, cut and assembled, take a rest. And do whatever you can do in advance. You'll have more fun cooking.

Monday, September 27, 2010

7. understand wet vs. dry cooking


(Part of The Cookbook)


With one exception, you don't create flavors when you make a dish. What you do is simply arrange foods and seasonings together so they complement each other and taste good, but the flavors in those foods are created by nature. I know you're with me so far.

The one thing you can do in the kitchen to add flavor is to brown a food item with heat. Browning changes the way a food tastes drastically. Think about the flavor of mushrooms simmered to doneness in a soup compared to mushrooms roasted crispy in a hot oven. Browning makes such a difference that it splits the whole world of cooking methods into three categories: wet cooking where no browning occurs, dry cooking where browning does occur, and combination cooking methods, where both wet and dry cooking takes place.

Wet cooking involves water somehow. Since water evaporates at 212 deg. F. and browning occurs between around 300 and 360 deg. F, you'll never get browning using a wet cooking method.

By understanding the nature of the cooking method you're thinking about using, you can more accurately predict what your result will be.

Wet cooking methods:
Boiling/simmering/poaching - immersion in hot, water-based liquid of varying temperature ranges
Steaming - contact with steam from some source of boiling water

Dry cooking methods:
Sauteeing - high heat, a little bit of fat in a shallow pan
Frying - high heat immersion in fat
Roasting/Broiling - contact with hot air (roasting) or proximity to a nearby object that radiates heat (broiling)
Baking - contact with hot air
Grilling - contact with heated metal and proximity to a nearby heat source

Combination cooking methods:
Braising/stewing - browning of large items (braising) or small items (stewing), then immersion in water-based liquid

For examples, you can find a list of recipes grouped by the above cooking methods here (scroll down to the "Browse by cooking method" section).

Why do I keep using the weird term "water-based liquid?" Well, oil's a liquid too, but it has nothing to do with wet cooking because it's not water.

There's another method that doesn't quite fit in the above categories. Sweating is low-heat sauteeing, and as a result, it doesn't brown food very much. It actually creates a steaming effect by gently bringing out the water in foods as steam. So, it's a kind of weird method. I like it, though. It's gentle and subtle.

In most cases, I think browning an item to develop flavors is a good idea and I do it a lot, even if I'm just going to add it to a soup later. If you put a little color on your onions by sauteeing them for a couple of minutes and then add them to your simmering stock, they'll add both the basic onion flavor and the rich, mellow, complex flavor of browned onion.

Given the choice of getting more or less flavor from something you paid for, which would you choose?

2. shop for meat


(Part of The Cookbook)


Caution: politics ahead.

Try to find a butcher shop you feel good buying meat from. You should be able to tell the butchers what you're planning to cook and have them recommend the right cut of meat and tell you the best way to cook it. (We'll go over cooking methods for meat later.) If there isn't one near you, go ahead and go to the supermarket for your meat. Wherever you go, do not purchase meat from factory farms. This is harder to do if you go to the supermarket, but it's possible if you're familiar with a few large-scale producers that are also sustainable. Chicken from Draper Valley Farms in Oregon and Washington is a great example. You should be able to get a little information about where your meat is coming from. At a good butcher, the name of the farm the meat came from will be right on the price tag. Or, you should be able to ask the butcher.

But most of the meat you'll find in the supermarket is garbage, the product of over-subsidized, over-produced commodity crops like corn, and the practices of huge agricultural corporations focused on making money at the expense of their products' nutritional value and their customers' health. Sustainabletable.org put together a great list of reasons to buy meat produced in a sustainable manner, here: http://www.sustainabletable.org/issues/  The list is even alphabetized.

You'll notice that "happy" meat looks healthier and smells better even before you cook it. It tastes better. That's because sustainable producers don't cut the corners that large conventional factory farms cut in order to drive their prices down. You'll also quickly notice that the meat is more expensive. Yep, that's what it costs to produce meat that isn't full of growth hormones and antibiotics, and packed into stacked cages or feedlots with such concentrations that their waste becomes impossible to contain. Remember the egg recall? The source of the salmonella was likely rodents getting into the chicken feed and pooping there. I remember an industry spokesperson defending their practice by saying something like, "You could have the same problem with pests whether you have an operation with a hundred or a million chickens." But which pest problem is easier to clean up? The sheer scale of such huge operations makes it nearly impossible to keep them clean and their products healthy for consumption. They do things to compensate, like feeding the animals antibiotics, washing their meat in chlorine baths or treating it with ammonia before you buy it, but those things aren't good for people, either.

Are they evil? I say no. They're responding to the public demand for lots of cheap meat. They're just selling us what they think we want so they can make money. I believe that the public demand needs an adjustment so it's more in line with our health needs.

So, good meat's expensive, but if you eat less of it,  you can easily afford it. Most American diets are really meat-heavy. If you do eat a lot of meat now, a good way to wean yourself off it a bit is to try cooking with smaller amounts of nicer meat and notice the difference in the way the food tastes and the way you feel afterwards. Your palate and your body cannot lie to you. Pay attention to them and you'll be rewarded.

And, we're off the soapbox now. Thanks for your patience.

Oh, what cuts of meat should you buy? Mostly things you can braise. They're cheap and really flavorful.

14. braise/stew

(Part of The Cookbook)

(I will put things here soon. Good things)

Sunday, September 26, 2010

0. have some basic ingredients on hand


(Part of The Cookbook)


Some things last for a recipe, like meats and produce. And some things last for several recipes, like these:

salt (kosher is best)
pepper (nice, freshly ground pepper makes a big difference in flavor)
high-heat cooking oil, like canola oil, vegetable oil, grapeseed oil or peanut oil
vinegar or extra lemons
unsalted butter
olive oil

I would say that if you're just getting started cooking from scratch, you need at least these things. You may think that it's a short list and if you think that, you're right. You use mostly fresh ingredients when you cook from scratch.

-1. have some basic equipment


(Part of The Cookbook)


You need tools for any job. You need cooking tools for cooking jobs, and I think you should have at least these tools:

a chef's knife
a bread knife
a smaller knife that you like

a cutting board

a medium saucepan (2-3 qts)
a medium saute pan (around 8-10 inches)
a large pot (around 2 gallons)
a large wire mesh strainer
a couple spoons, one slotted
a rubber spatula
a baking dish (preferably with a cover)
a sheet pan or two
2-3 mixing bowls, at least one large
a whisk
a pair of metal tongs

I won't insult you by telling you to get things as basic as dinnerware, flatware & can openers, because you wouldn't try to open a can with a knife anyway. Messy. Blood and crying.

Saturday, September 25, 2010

1. shop for produce

(Part of The Cookbook)


I believe that one of the most important steps in cooking from scratch is selecting seasonal and affordable produce. If you do that first and then buy other things to complement the produce, it's pretty easy to cook without using a recipe.


So, I go to the produce stand first. Produce is a bigger variable than meat (more seasonal), and I like to cook food with a lot of veggies and a little or no meat, so once I get the produce together, I'll know what other things to get. I look first in the "#2" or slightly blemished produce bins, which exist at (I think) all the produce stands in the Pike Place Market, and many stands at neighborhood farmer's markets, too. The availability of these cosmetically damaged but still very nutritious and cheap items is even more of a variable than the rest of the produce. So, by starting there and building around those first selected items, you're maximizing your food dollars already. Some places sell pre-packaged bags of slightly blemished produce instead of keeping them in bins.

Still at the produce stand, after getting everything I can from the "#2" bins, I continue by selecting things that I like and that are in season. Ask someone if you don't know what's in season, but sometimes I can tell just by looking closely at everything and noticing which fruits and veggies almost appear to be glowing, their colors are so happy and vibrant. When I think I have about enough produce, I start physically grouping items together into clusters. If I think or know that things will taste good together, I put them together. Then I start thinking in terms of the types of dishes I like to make (salads, sandwiches, naked casseroles, soups, etc.), and I see which clusters of produce might fit those categories. I grab anything else I need to complete the recipes, which are at that point created in terms of what I know I will be cooking together.

Then I just go and get whatever else I need in terms of bread, grains, or whatever else I need to make the recipes I decided on at the produce stand. I write the details of the recipes later, which I will admit was a pain in the butt for me to start doing, but I'm glad I made myself do it because I'm able to share my recipes now. So, the next time you come up with something new, consider writing it down. I'd like to see it!

That's my process. If you've ever seen me stand for long periods of time at the produce stand with a vacant look on my face, now you know why.

If you want information on seasonal produce before you go to the farmer's market, here's an awesome site for that: http://seasonalcornucopia.com/sc/default.asp

Thursday, September 23, 2010

September CK Digest

Hello fellow eaters!

Thanks to those who came out to the Senior Center Thursday night. I had a great time cooking with you! It was a lovely group, filling the kitchen with lots of fun and energy. The recipes are attached*, so if you couldn't make it, you should try them at home. Let me know how they work for you, or if you come up with a variation on one.

We made some delicious food. I like these recipes, although I was planning to go with a different theme until a couple days before the community kitchen. My original plan was to research the cuisines of a few different countries, select a few traditional dishes that I thought would use a reasonable amount of in-season produce, and cook those recipes. We'll probably do that next month, and I think that'll be a nice change from the usual completely new and sometimes unusual combinations.

But I didn't do that research! Failed! So what to do? I just went with my normal process for writing recipes for the CKs. We actually talked about it at the Thursday CK as we ate our salad, but I'd like to repeat it here:

First, I go to the produce stand. I go there first because produce is a bigger variable than meat (more seasonal) and because I like to cook food with a lot of veggies and a little or no meat, so once I get the produce together, I'll know exactly what meat to get. I look first in the "#2" or slightly blemished produce bins, which exist at (I think) all the produce stands in the Pike Place Market, and many stands at neighborhood farmer's markets, too. The availability of these cosmetically damaged but still very nutritious and cheap items is even more of a variable than the rest of the produce. So, by starting there and building around those first selected items, you're maximizing your food dollars already. Some places sell pre-packaged bags of slightly blemished produce instead of keeping them in bins.

Still at the produce stand, after getting everything I can from the "#2" bins, I continue by selecting things that I like and that are in season. Ask someone if you don't know what's in season, but sometimes I can tell just by looking closely at everything and noticing which fruits and veggies almost appear to be glowing, their colors are so happy and vibrant. When I think I have about enough produce, I start physically grouping items together into clusters. If I think or know that things will taste good together, I put them together. Then I start thinking in terms of the types of dishes I like to make (salads, sandwiches, naked casseroles, soups, etc.), and I see which clusters of produce might fit those categories. I grab anything else I need to complete the recipes, which are at that point created in terms of what I know I will be cooking together.

Then I just go and get whatever else I need in terms of bread, grains, or whatever else I need to make the recipes I decided on at the produce stand. I write the details of the recipes later, which I will admit was a pain in the butt for me to start doing, but I'm glad I made myself do it because I'm able to share my recipes now. So, the next time you come up with something new, consider writing it down. I'd like to see it!

That's my process. If you've ever seen me stand for long periods of time at the produce stand with a vacant look on my face, now you know why.

cheers!
-ryan

*The recipes were:

Friday, September 17, 2010

Chorizo, Apple & Kale Sandwich

From the September Pike Market Community Kitchen at the Pike Market Senior Center.


Cooking skills focus: Sauteeing, balancing flavors

Ingredients:
1 t cooking oil
6 chorizo sausages (Spanish style, fresh, not cured), sliced 1/2" thick
1 T cooking oil (if needed, see below)
2 bu kale, ribs removed & cut bite-sized
1 head garlic, cloves peeled & sliced
salt & pepper TT
1 lemon, juiced
3 apples, diced medium (1/2" or so on a side)

Instructions:
1. Heat a large saute pan over high heat. When you can see some wavy smoke lines coming from the pan, add the 1 t oil. Allow it to heat up for a few seconds, coating the pan, and get ready to add the chorizo.
2. Add the chorizo and brown well. reduce heat to medium-high and cook through. Remove and set aside. Heat the pan again over medium-high heat.
3. You will be adding the kale in batches since the pan won't hold all of it at once without being really overcrowded. Before the first batch, if there isn't enough combined oil and fat rendered off the chorizo to coat the bottom of the pan with a decent layer, add up to 1 T cooking oil.
4. Add the kale and garlic in batches, season with salt and pepper and stir gently, cooking each batch for 6-8 minutes or until the kale is well-wilted. When everything's cooked, mix it on a bowl with the chorizo and add the lemon juice. Taste it and season it with salt and pepper if it needs it. Add the apple.
5. Stuff it in a sliced, toasted baguette and eat it!

Taste how the sweetness of the apple complements the spiciness of the chorizo, the tartness of the lemon contrasted with the savory depth of the onion, garlic and kale, and how the textures create a variety of mingled sensations on your mouth. Great job!

Togarashi Naked Casserole (vegan)

From the September Pike Market Community Kitchen at the Pike Market Senior Center

Cooking skills focus: Knife skills, sauteeing, baking

Ingredients:
2 T cooking oil
1 # crimini mushrooms, quartered
1 yellow onion, cut in half and sliced 1/4" thick
1  head garlic, cloved peeled & sliced 1/4" thick
4 Yukon gold potatoes, diced 1/2" on a side
1 head cauliflower, cut about 3/4" on a side
1 bu broccoli rabe, bottom 1/4" trimmed and sliced 1/2" thick all the way up
2 T olive oil
salt & pepper TT (about 2 t salt and 1/2 t pepper)
1 T & 1 t togarashi shichimi (Japanese seven spice)
1 lemon, juiced

Instructions:
1. Preheat the oven to 400 degrees.
2. Heat a large saute pan over medium-hgh heat. When you can see some wavy smoke lines coming from the pan, add the 2 T oil. Allow the oil to heat up for a few seconds, coating the pan, then add the mushrooms.
3. Brown the mushrooms for 4-5 minutes, stirring occasionally, then add the onion and garlic. Saute for 4-5 minutes more. Transfer to a very large bowl.
4. Add all of the remaining ingredients except the lemon juice. Toss gently until well-mixed. Transfer to a baking dish, cover and bake for 45 minutes to an hour, or until the potatoes are done. Sprinkle with the lemon juice. Taste and add more seasoning if desired.

Doesn't that taste healthy and also delicious? Healthy doesn't have to taste like rabbit food, no no no. You can do this with any combination of vegetables; just make sure everything's seasoned and all the pieces are cut so they'll cook at around the same time.

Crazy Vegetable Salad (vegan)

From the September Pike Market Community Kitchen at the Pike Market Senior Center.

Cooking skills focus: Knife skills, roasting, balancing flavors

Ingredients:
4-5 yellow squash, cut bite-sized
1 yellow onion, cut in half and sliced thinly
2 C vinegar (white/red wine, rice, apple cider, or even distilled white will do)
2 C water
2 t salt
1 t pepper

1 # crimini mushrooms, cut in half and then sliced thickly
2 T cooking oil
salt & pepper TT (about 1 t salt & 1/2 t pepper)

2 bu spinach, trimmed & cut bite-sized
1 bu radishes, trimmed & sliced thinly
3 avocadoes, diced
2 cans of beans, drained & rinsed
1 lemon, juiced
2 T olive oil
salt & pepper TT

Instructions:
1. Preheat the oven to 400 degrees.
2. Marinate the squash and onion: divide the vinegar, water, salt & pepper into two containers and put the squash in one and the onion in another. mix and leave to marinate for 30 minutes.
3. Meanwhile, toss the mushrooms with the 2 T cooking oil, salt & pepper, and transfer to a sheet pan. Roast in the oven for 20 minutes or until crispy. Set aside in a large bowl.
4. Remove the squash and onion from the marinade and add them to the mushrooms. Add all of the remaining ingredients. Season to taste and serve.

Another score for vegan goodness! This is less of a salad and more of a celebration of how nicely a variety of veggies and legumes can play together. Flavors and textures are distinctive but harmonize well.

Harissa-Spiked Chicken & Corn Stew with Pineapple


Cooking skills focus: Preparing meat for cooking, braising/stewing, balancing flavors

Ingredients:
1 qt chicken stock (homemade is strongly preferred, but sometimes you have to make do)
1 large can crushed tomatoes

1 T cooking oil
8 chicken thighs, meat cut off the bone & diced about 1/2" on a side
salt & pepper TT
1 yellow onion, diced 1/2" on a side
1/2 head garlic, cloves peeled & sliced thinly

6-7 ears corn, kernels cut off the cob
4 Yukon gold potatoes, diced 1/2" on a side
4 T harissa spice blend
salt & pepper TT (about 2-3 T salt and 1 T pepper)
water if needed (see below)

1/2 pineapple, diced about 1/2" on a side

Instructions:
1. In a large pot, heat the stock and tomatoes together to a simmer, over medium-low.
2. Heat a large saute pan over high heat. When you can see some wavy smoke lines coming from the pan, add the 1 T oil. Allow the oil to heat up for a few seconds, coating the pan, then add the chicken, season with some salt & pepper and brown well, for about 3-4 minutes on high. Be careful, especially when moving the chicken around in the pan!
3. Reduce the heat to medium-high and stir in the onion and garlic. Saute for 2-3 minutes and then add to the simmering stock & tomatoes.
4. Add the corn, potatoes and seasoning. Add a little more water if needed but keep the consistency stew-like. Cover and simmer over low heat for 45 minues to an hour, until the potatoes are done and the chicken is tender. Taste and adjust the seasoning if needed.
5. Serve with the pineapple as a garnish in the middle of each bowl.

This recipe embodies the power of balancing flavors. You have sweet and savory playing together in a multitude of ways, given the chicken, onion and garlic as savory, the corn and tomato as sweet and savory combined, the harissa spice blend as sweet and savory also but in the form of spices, and the pineapple as sweet but also tangy, and that pineapple tangyness reaching back to the tomato's delicious acidity and connecting there. It's a complex web of flavors that's pretty easy to create.

Black Pepper Pineapple (vegan)


Cooking skills focus: Balancing flavors

Ingredients:
1/2 pineapple, diced
1 tiny pinch salt
a couple good pinches of black pepper, preferably freshly ground

Instructions:
1. Toss the pineapple with the salt and black pepper, and leave to macerate (break down and exude its own syrup) for 15 minutes. Serve as-is, or over ice cream or cake.

Is this even a recipe? I almost feel silly writing it down, it's so simple.